
In this article, we will teach you how to master the ‘Sheets’ option in the Lantek menu and turn a problem into one of the best allies you will have when it comes to improving productivity when nesting and machining your jobs.
Let’s get into detail.
Configuration of sheets in Lantek
First things first, how to access and configure sheet material in Lantek?
First, go to the ‘Manage’ menu and find the ‘Sheets’ option, which is within the ‘Components’ section; By clicking on ‘Sheets’ you will open a window with everything you need to properly manage your sheet material.
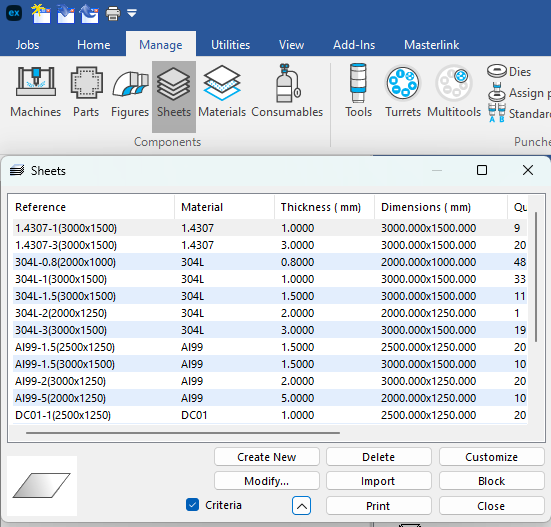
Here you will find the key parameters that will allow you to create the sheet sizes you use every day.
Click on the ‘Create New’ button. This option will open a new window where it will ask you for the following values:
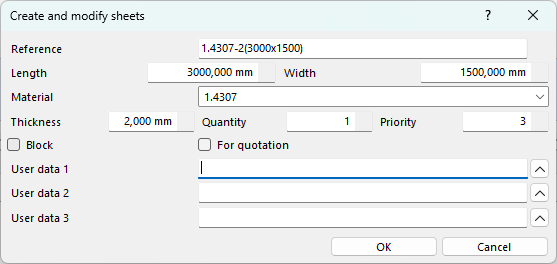
Additionally, in this window you will find the options to block or reserve sheets against a quotation. There are also three alphanumeric fields for user data, where you can add any notes you deem appropriate so that the set of sheets that correspond to this reference are fully identified.
Do you already have everything defined? Perfect! If you are one of those who think that this task is not particularly useful, you are very wrong. Configuring the sheets in Lantek is the first step to getting control of your work from the outset, and it will save you a lot of time later on.
Management of sheets and lists.
Now that you have the sheets under control, it’s time to manage them like a professional.
Lantek gives you the opportunity to organize and control your inventory of available sheets. How will we do it? By applying filters, of course!
From the same window that you used to create sheets, you can filter and sort your sheets according to your needs. Do you want to see only sheets of a certain thickness and with a defined format? Or maybe just the stainless steel ones? No problem.
From the same window where you have created the sheets you have a marker called ‘Criteria’ that can be activated or deactivated, and next to it a button with an arrow pointing up. Clicking on this arrow opens a window with all the options to filter the list of sheets.
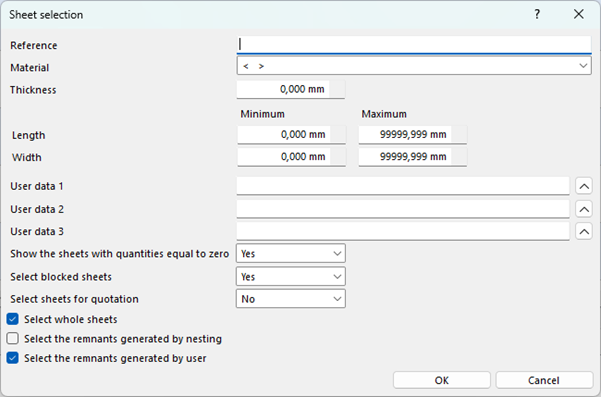
In this window you can filter by reference, material, thickness and of course by maximum and minimum dimensions of the sheets. In addition, you can also filter by user data and you can even activate or deactivate the following options:
As well as the above filters, you can activate others that you will find very useful, such as the following:
Select complete sheets: If activated, it will only select complete sheets.
Select remnants generated by the nesting: If activated, it will select only the remnants that have been automatically generated by nesting.
Select remnants generated by the user: If activated, it will only select remnants that you registered yourself.
With these lists, conveniently filtered, you will always know which sheets you have at your disposal to tackle the next job. By filtering correctly and selecting the sheets and/or remnants that you are going to want to work with, the automatic and semi-automatic aids that we have already talked about in previous articles will give the best results.
Good practice recommendations.
It is worth paying attention to these very important tips.
Always maintain an updated inventory, identify each sheet with a unique code and differentiate sheets that are the same in material, thickness and format but from different suppliers. Later you may want to prioritize consuming sheets from a certain supplier and having them with different references will make this possible, enabling you to set different priorities.
A key advantage in Lantek is that it offers a lot of flexibility in segmenting all the available sheets and remnants. This makes it very easy to use the automatic nesting aids, since it will only display sheets that meet the filters that you set during the organization of the sheets. Sheets sorted fully automatically. Now that’s a superpower!
Example of the system in action
Do you need more evidence about how good sheet management in Lantek will help you be more productive?
Imagine this scenario:
You have been creating sheets and remnants “on the fly” without any criteria and without worrying about putting in real stock quantities. You need a 3000x1500 sheet, you create it with any reference that comes to mind, you put any quantity on it and move on. Then you want to create another 2000x1000 sheet, you do the same, and so on over and over again.
One day you need to do a job involving thirty different parts and with quantities of several hundred of each type of part. A challenge for any CNC programmer!
But it turns out that after a long time creating sheets without any criteria, you have a massive list of sheets, most of which do not even exist in reality, but are registered in Lantek. Do you follow me?
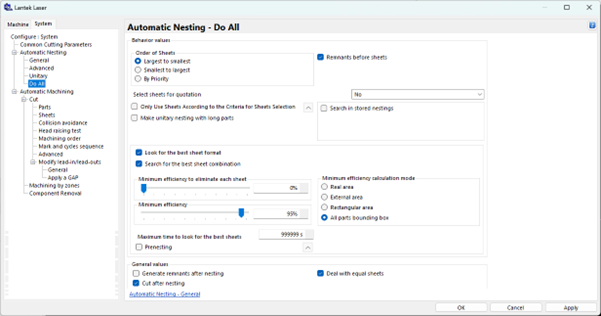
If you hit the ‘do all’ button, you will then need a ‘delete all’ button, because the result will be catastrophic, it will be useless, and what is worse, you will have to start again almost manually, working from sheet to sheet, just because the data in the Lantek sheet metal warehouse is not clean.
With the sheet metal warehouse clean and with all the sheets and remnants up to date, both in dimensions and stock, the “Do All” button will leave your work very advanced, if not almost done.
That’s all.
In summary, the ‘Sheet’ option in Lantek is a powerful tool that will allow you to control your machining projects with skill and security. Configure your sheets, organize your inventory and don’t forget that the flexibility of options available is your ally. Now that you know how to prevent sheet metal turning into a nightmare and how you can be a true master of CNC programming productivity.
So, dear sheet metal engineers, see you in the next article and happy machining